TUTORIAL
How to create a WordPress Plugin
| Updated 07.06.22
Creating my own WordPress plugin is something that has been on my horizon for a little while and I’ve only just got around to doing so. It was pretty easy to get something simple going, so I thought I would create a tutorial on how you can do it too.
The WordPress plugin I will be creating is just porting my code over from my Improving the WP admin bar tutorial. I thought it is better suited to be a plugin so it can be easily turned on or off and used in future projects.
I eventually published my plugin on WordPress, you can find it here.
WordPress Plugin Tutorial
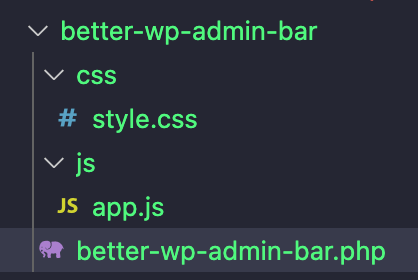
First things first, we need to create a folder where our plugin will live, inside our WordPress directory. Simply navigate to your plugins folder wp-content/plugins and then create a folder with your plugin’s name and place it inside.
Then inside of that, create a CSS folder with a style.css in it and a JS folder with an app.js file inside.
Finally, at the root of the initial folder, create a PHP file with the name of your plugin once again.
It should look something like this below:
PHP
The next step is one of the most important as we need to tell WordPress some vital information about our plugin for it to be considered valid. To do this we create a header comment with at least our plugin name field filled in. I am going to add some more, but you don’t have to. You can find more information about what you should add in your header comment via the amazing WordPress Codex be sure to check it out for more information.
After creating the header comment, we need to load or enqueue our CSS and JS files via the usual way in WordPress. It is good practice to have an if statement around your functions to check if they exist before being created, so I’ve done so below.
<?php
/*
Plugin Name:  Better WP Admin Bar
Description:  A tiny plugin to make the WordPress admin bar less annoying when working with a fixed header theme.
Version:      1.0
Author:       Dalton Walsh
Author URI:   https://www.daltonwalsh.com
License:      GPL2
License URI:  https://www.gnu.org/licenses/gpl-2.0.html
Text Domain:  better-wp-admin-bar
Domain Path:  /languages
*/

if ( ! defined( 'ABSPATH' ) ) {
	exit; // Exit if accessed directly
}

add_action('wp_enqueue_scripts','betterWpAdminBar');

if ( !function_exists( 'betterWpAdminBar' ) ) {
  function betterWpAdminBar() {
      wp_enqueue_script( 'better-wp-admin-bar-js', plugins_url( '/js/app.js', __FILE__ ));
      wp_register_style( 'better-wp-admin-bar-css', plugins_url( '/css/style.css', __FILE__ ) );
      wp_enqueue_style( 'better-wp-admin-bar-css' );
  }
}
CSS & JS
The CSS and JS are taken from my previous tutorial which can be found here, so I won’t be going into detail again about what is happening. The only difference here is that I haven’t written my styles in an SCSS file, just normal CSS. You can of course use SCSS in your plugins if you have the correct setup to do so, I currently do not but luckily I don’t have many styles with this one, so it isn’t an issue.
The JS:
window.addEventListener("load", () => {
const adminBar = document.querySelector("#wpadminbar");
if (adminBar) {
improveAdminBar(adminBar);
}
function improveAdminBar(adminBar) {
const head = document.querySelector("head");
const styleTags = head.querySelectorAll("style");
styleTags.forEach((styleTag) => {
if (
styleTag.textContent.includes("html { margin-top: 32px !important; }")
) {
styleTag.remove();
}
});
toggleOpen("#wpadminbar, .wpadminbar-click-box");
adminBar.insertAdjacentHTML(
"beforeend",
``
);
}
function toggleOpen(el) {
document.querySelector(el).addEventListener("click", ({ target }) => {
adminBar.classList.toggle("open");
});
}
});The CSS:
@keyframes pulse {
  0%,
  100% {
    opacity: 0.1;
  }

  50% {
    opacity: 0.5;
  }
}

#wpadminbar {
  position: fixed !important;
  transform: translateY(-32px);
  transition: transform 0.5s;
  will-change: transform;
}

#wpadminbar:hover,
#wpadminbar.open {
  animation: none;
  opacity: 1;
  transform: translateY(0);
}

#wpadminbar:hover .wpadminbar-click-box,
.wpadminbar-click-box:hover,
#wpadminbar.open .wpadminbar-click-box {
  animation: none;
}

#wpadminbar .wpadminbar-click-box {
  width: 70px;
  height: 30px;
  color: #f0f0f1;
  background-color: #1d2327;
  position: absolute;
  left: 0;
  right: 0;
  bottom: 0;
  transform: translateY(29px);
  padding: 0 2px;
  margin: 0 auto;
  border-bottom-right-radius: 10px;
  border-bottom-left-radius: 10px;
  text-align: center;
  font-size: 12px;
  will-change: transform;
  transition: transform 0.2s;
  cursor: pointer;
  animation: pulse 10s ease-in-out infinite;
  font-family: sans-serif;
}

@media screen and (max-width: 782px) {
  #wpadminbar .wpadminbar-click-box {
    width: 60px;
    font-size: 11px;
  }

  #wpadminbar {
    transform: translateY(-46px);
    min-width: auto !important;
  }
}
There you have it, be sure to activate your plugin in the admin area, I hope this will be helpful to people, this was short and sweet but you can go as advanced as you want to when creating a WordPress plugin.
For more tutorials, check out the rest of my blog and be sure to leave a comment if you need any help with anything.